Want to learn how to easily fix the leverage browser caching warning in WordPress? By fixing the leverage browser caching warning, you will be able to speed up your WordPress site quickly and provide a better experience for your website visitors.
In this article, we will show you how to easily fix the leverage browser caching warning in WordPress.
What is the Leverage Browser Caching Warning?
The leverage browser caching is one of the ways to improve the loading speed of your WordPress website.
When a web page is loaded, all files will be uploaded separately. This creates multiple requests between the browser and server hosting for WordPress, which increases the load time of the website.
When you have enabled the browser caching, the web browser locally stores a copy of your web page. This allows browsers to load common files such as style sheets, logos, images, etc. faster when the user visits a second page of your site.
This reduces the overall server load because fewer requests will be made to the real server and your website performance will improve as a result.
Where Will You See the Browser Caching Exploit Warning for WordPress?
The warning of exploiting browser caching means that you don’t have browser caching enabled, or your caching might be set up incorrectly.
When you are running a website speed test, you will get a report that will show you what you have to fix to speed up WordPress.
If you are not currently using browser caching on your website, then it will surely give you the warning to enable browser caching.
Here’s how it can look when you look at your results from a page speed reporting tool. Sometimes you will get a warning that your efficient cache policy is not working.
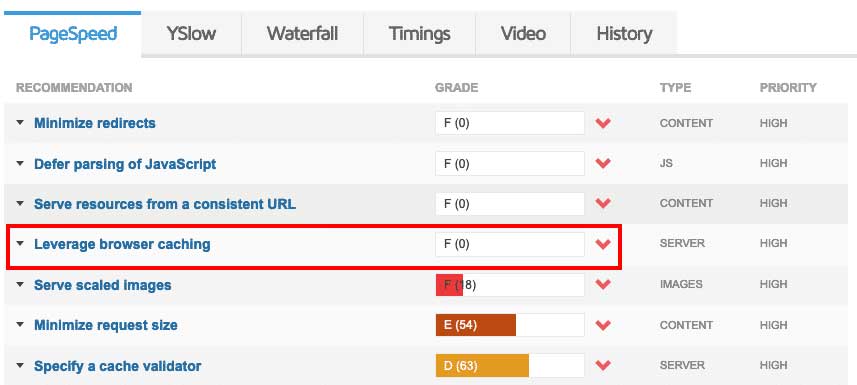
Both warnings refer to an error with your browser’s cache settings. Taking advantage of browser caching means enabling and customizing caching rules to speed up your site.
The Best Ways to Fix the Leverage Browser Caching in WordPress
There are multiple ways to fix the browser caching warning in WordPress, depending on the cause. Let’s talk about them:
1. Add Cache-Control and Expires Headers
There are 2 settings related to browser caching: Cache-Control and Expires. At least one has to be present to allow browser caching for your site.
While the Cache-Control header activates client-side caching of the service and sets the maximum age of a resource, the Expires header is used to specify a time when the resource is no longer valid.

It is not necessary to incorporate both, as this can be redundant. Checking the cache is the best practice usually.
In the event that you are using a different hosting provider, make sure to make a backup of your site already before continuing the steps outlined now, when editing .htaccess could break your website if you’re not careful.
How to Incorporate Cache-Control Headers in Nginx?
To incorporate cache-control headers into Nginx, you can incorporate the following into your server’s configuration file:
location ~* .(js|css|png|jpg|jpeg|gif|svg|ico)$ {
expires 30d;
add_header Cache-Control "public, no-transform";
}
This tells your server that the detailed file types will not change for at least thirty days. It will hold the relevant files saved throughout that period before updating them.
How to Incorporate Cache-Control Headers in Apache?
If you have an Apache server on your site, you can embed the following code into your file .htaccess:
<filesMatch ".(ico|pdf|flv|jpg|jpeg|png|gif|svg|js|css|swf)$"> Header set Cache-Control "max-age=84600, public" </filesMatch>
This clipping must be added before “#BEGIN WordPress” or after “#END WordPress”. In such a case, the cache is scheduled to expire after eighty-four thousand six hundred seconds.
How to Incorporate Expiration Headers in Nginx?
You can incorporate the Expires headers into Nginx by adding the following to your server block. In this example, you can see how to specify different expiration times based on file genres:
location ~* .(jpg|jpeg|gif|png|svg)$ {
expires 365d;
}

location ~* .(pdf|css|html|js|swf)$ {
expires 2d;
}
How to Incorporate Expiration Headers in Apache?
You can incorporate Expires headers into Apache by adding the following to your file .htaccess:
EXPIRES HEADER CACHING ##
<IfModule mod_expires.c>
ExpiresActive On
ExpiresByType image/jpg "access 1 year"
ExpiresByType image/jpeg "access 1 year"
ExpiresByType image/gif "access 1 year"
ExpiresByType image/png "access 1 year"
ExpiresByType image/svg "access 1 year"
ExpiresByType text/css "access 1 month"
ExpiresByType application/pdf "access 1 month"
ExpiresByType application/javascript "access 1 month"
ExpiresByType application/x-javascript "access 1 month"
ExpiresByType application/x-shockwave-flash "access 1 month"
ExpiresByType image/x-icon "access 1 year"
ExpiresDefault "access dos days"
</IfModule>
## EXPIRES HEADER CACHING ##
You can then go through the headers by running your place through Google PageSpeed Insights again and see if the warning persists.
2. By Using WP Rocket Plugin
WP Rocket is now one of the best WordPress caching plugins. This plugin is very much friendly for beginners and it helps to optimize site speed without knowing complex terms of speed and caching.

You must have to install and activate the WP Rocket plugin to fix the browser caching warning for leverage
That’s it.
For more details, check out our guide on how to properly install and configure WP Rocket in WordPress.
You will see that the plugin will automatically enable browser caching and modify the .htaccess file with the correct rules.
Check the WP-Rocket Plugin.
3. By Using W3 Total Cache Plugin
You can also look at the W3 Total Cache Plugin for speeding up your browser.
First, you need to install the W3 Total Cache WordPress plugin then go to general settings and enable the browser cache. Then choose the cache headers available. Next, you have to set the expires headers, cache-control, and ETag headers. And finally, save all the changes and refresh your website.
This plugin will surely help your site to load faster and save all the cache files for further support.
Check the W3 Total Cache Plugin.
4. Use the Cache Enabler Plugin
The Cache Enabler Plugin is one of the most powerful WordPress caching plugin that increases site speed.
Its configuration is very simple and very much easy to use. This plugin creates static HTML files of frontend pages and stores them on the server’s disk.
Just install the plugin and activate it. Then go to settings and click on Enable Leverage Browser Caching.
Check the Cache Enabler plugin.
5. Minimize the Use of Third-Party Scripts
Sometimes the Analytics script can create problems for your Google PageSpeed Insights score due to the fact that it is hosted on the Google server, so you are not in control of the cache.
The same goes for other third-party scripts. If you are running a business through your WordPress site, you most likely have other third-party scripts running to track conversions, A/B testing, and more.
This could include scripts like Fb conversion pixels, Crazy Egg, Hotjar, and others. Unfortunately, unless you can find a way to host these scripts locally, there isn’t much you can do to monitor them.
Conclusion
Hopefully, this article will help you to fix leverage browser caching warnings in WordPress easily. Although it is not a strict measure of the performance of your site, Google PageSpeed Insights is still an acceptable indicator of how well it is doing. Improving your score by resolving the warnings in “Serve Static Assets with an Effective Caching Policy” can help make your site faster and more profitable for visitors. You can also read one of our most popular articles on some common errors and their solutions in WordPress.
If you face any trouble feel free to comment below. Our expert community will definitely help you as early as possible.